Introduction
In this project we were asked to develop a campaign to spread awareness to teens about fast fashion and present these teens alternative to fast fashion.
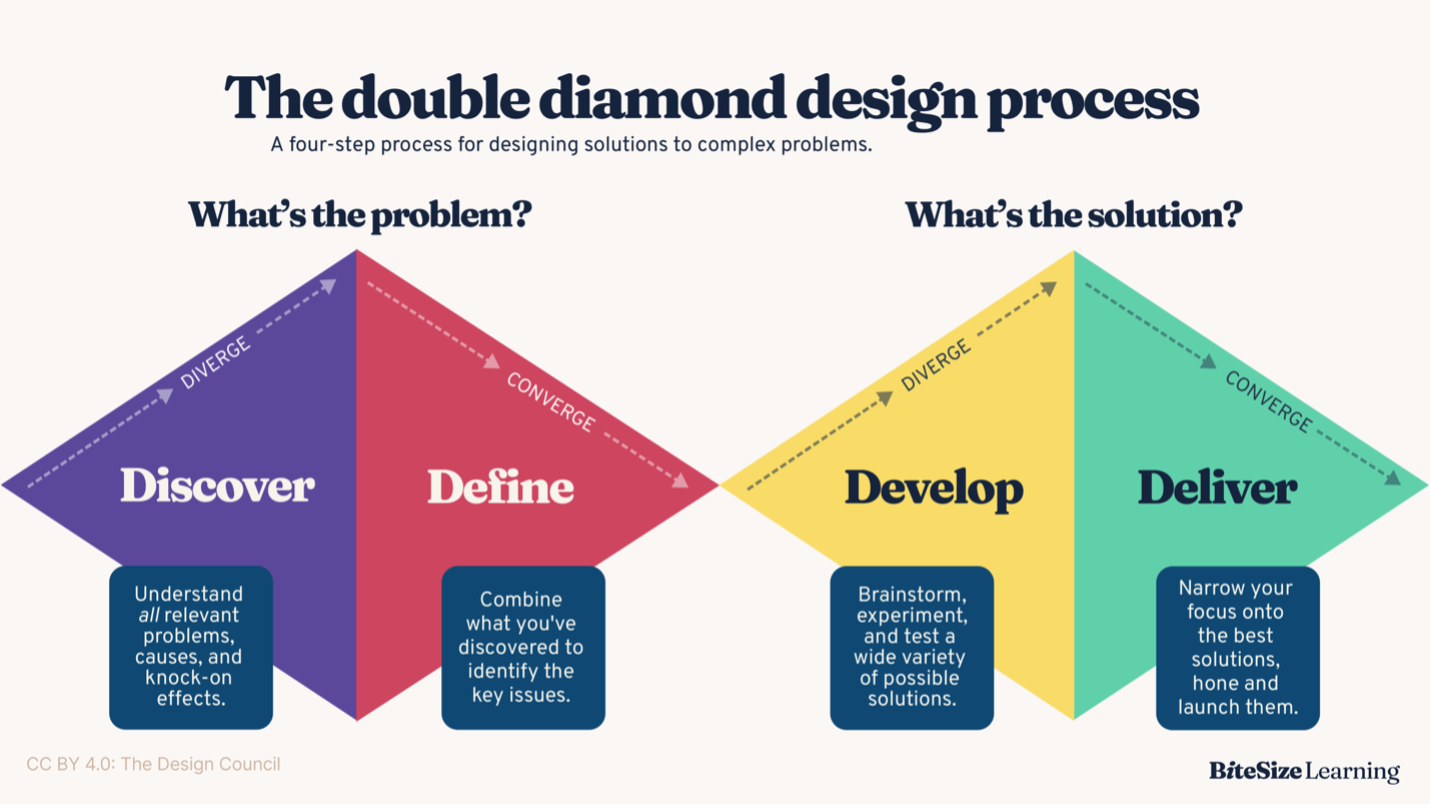
Double Diamond
We decided to use this method because teachers gave us a lot of information about Double Diamond, and everyone was familiar with the way Double Diamond works. The Double Diamond process consists of two diamonds. The first diamond represents Discover and Define whilst the second diamond represents Develop and Deliver.
Target Audience
This assignments goal is to make teens aware how bad Fast Fashion is and that there are better alternatives. This means that the target audience are teens. especially teens in The Netherlands. Using this information we later have done interviews with dutch teens which really helped us get good data to use.
Dot Framework LO4
The DOT Framework helped structure our research and development process throughout this project. Here are the key methods we used from each category:
Library
- Literature Study: Researched the environmental impact of fast fashion, including water usage, carbon emissions, and waste statistics.
- Best Practice Analysis: Studied high-quality clothing brands and their characteristics to understand what makes sustainable fashion different.
Field
- A/B Testing: Conducted tests with the target audience to compare different wardrobe interface designs.
- User Testing: Tested the receipt/wardrobe functionality with multiple users to improve usability.
- Stakeholder Interview: Regular meetings with the client to present progress and gather feedback.
Workshop
- Prototyping: Created multiple iterations of the game components (timeline, wardrobe, store) to test and improve the design.
- Concept Testing: Developed and tested different concepts for the receipt/wardrobe interface.
Lab
- Component Testing: Developed and tested individual React components for the game.
- Usability Testing: Tested the game's interface and mechanics with the target audience.
Showroom
- Expert Review: Presented our progress to stakeholders and teachers for feedback.
- Product Review: Final presentation of the game to stakeholders, teachers, and students.
Discover Phase
Research Questions
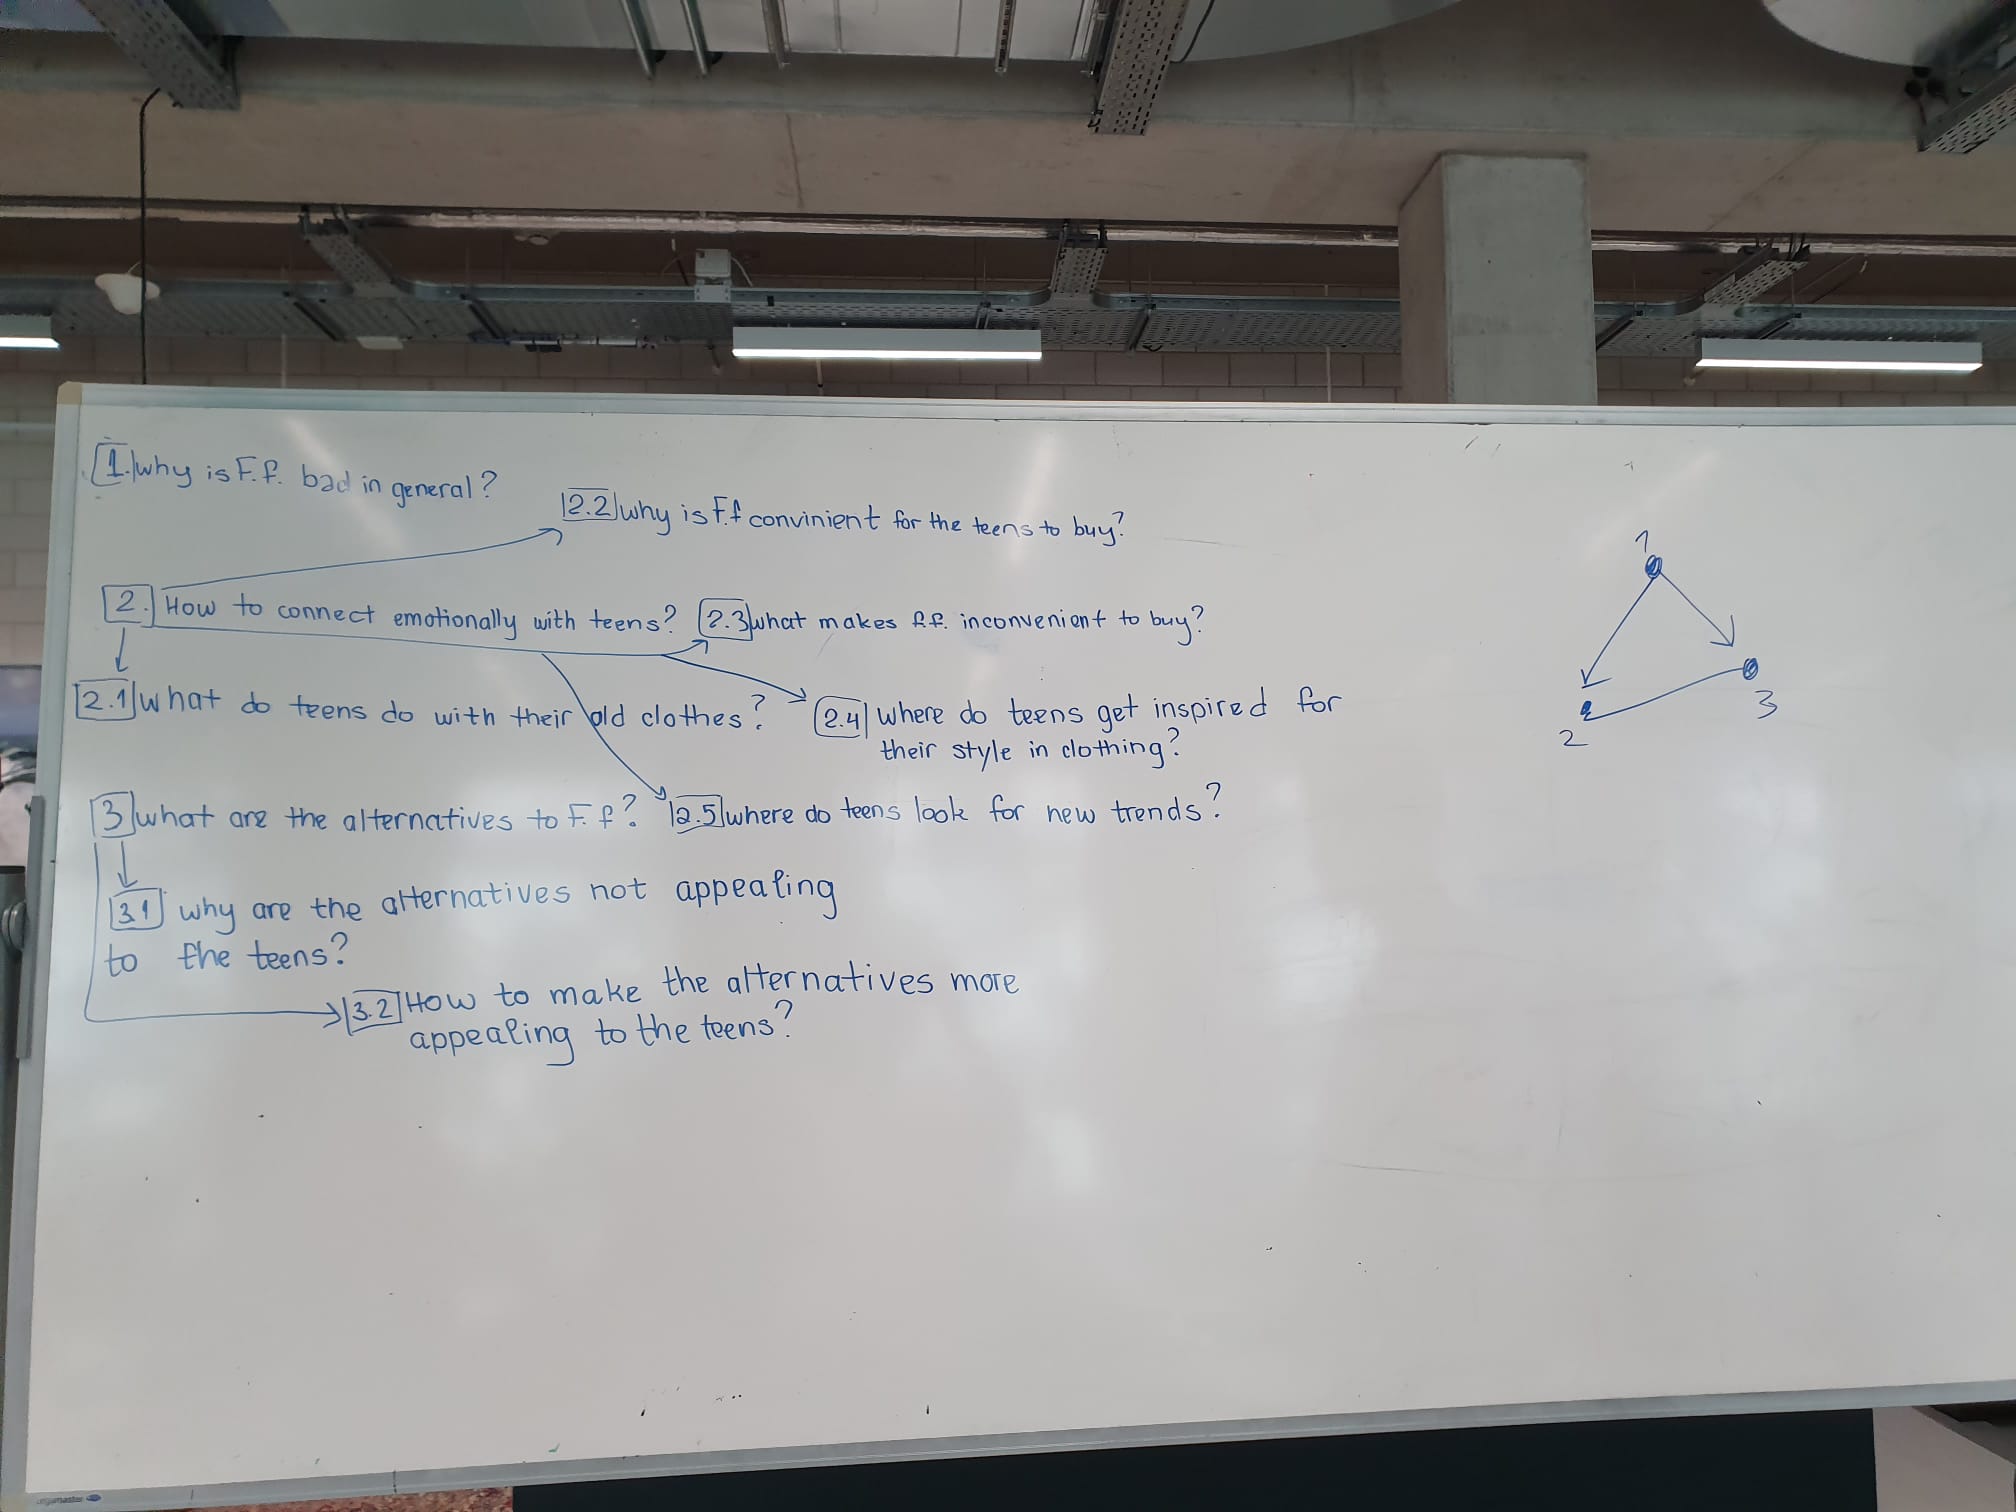
Before we knew what we wanted to make we wanted to research the target audience. We have done this by asking ourself three questions and a few sub-questions. You can find these below. After we did this everyone got assigned to a different question. I got assigned to the 1.0 questions and 3.3 questions.
- Why is Fast Fashion bad in general?
- How to connect emotionally with teens?
- What do teens do with their old clothes?
- Why is FF convinient for the teens to buy?
- What makes FF convinient to buy?
- Where do teens get inspired for their style in clothing?
- Where do teens look for new trends?
- What are alternatives to Fast Fashion?
- Why are the alternatives not appealing to the teens?
- How to make the alternatives more appealing to teens?
- Difference in High Quality Brands?
TrelloLO4 & LO5
Before we started working on this assignment we wanted to divide the tasks using Trello. We all came together to look at our questions and divide these questions in assignments. We looked at each questions and thought about how long this will take and what CMD methods we want to use. In consultation Matheusz added everyone do an assignments with an deadline, you can see these in the Trello which is really useful.
Trello Link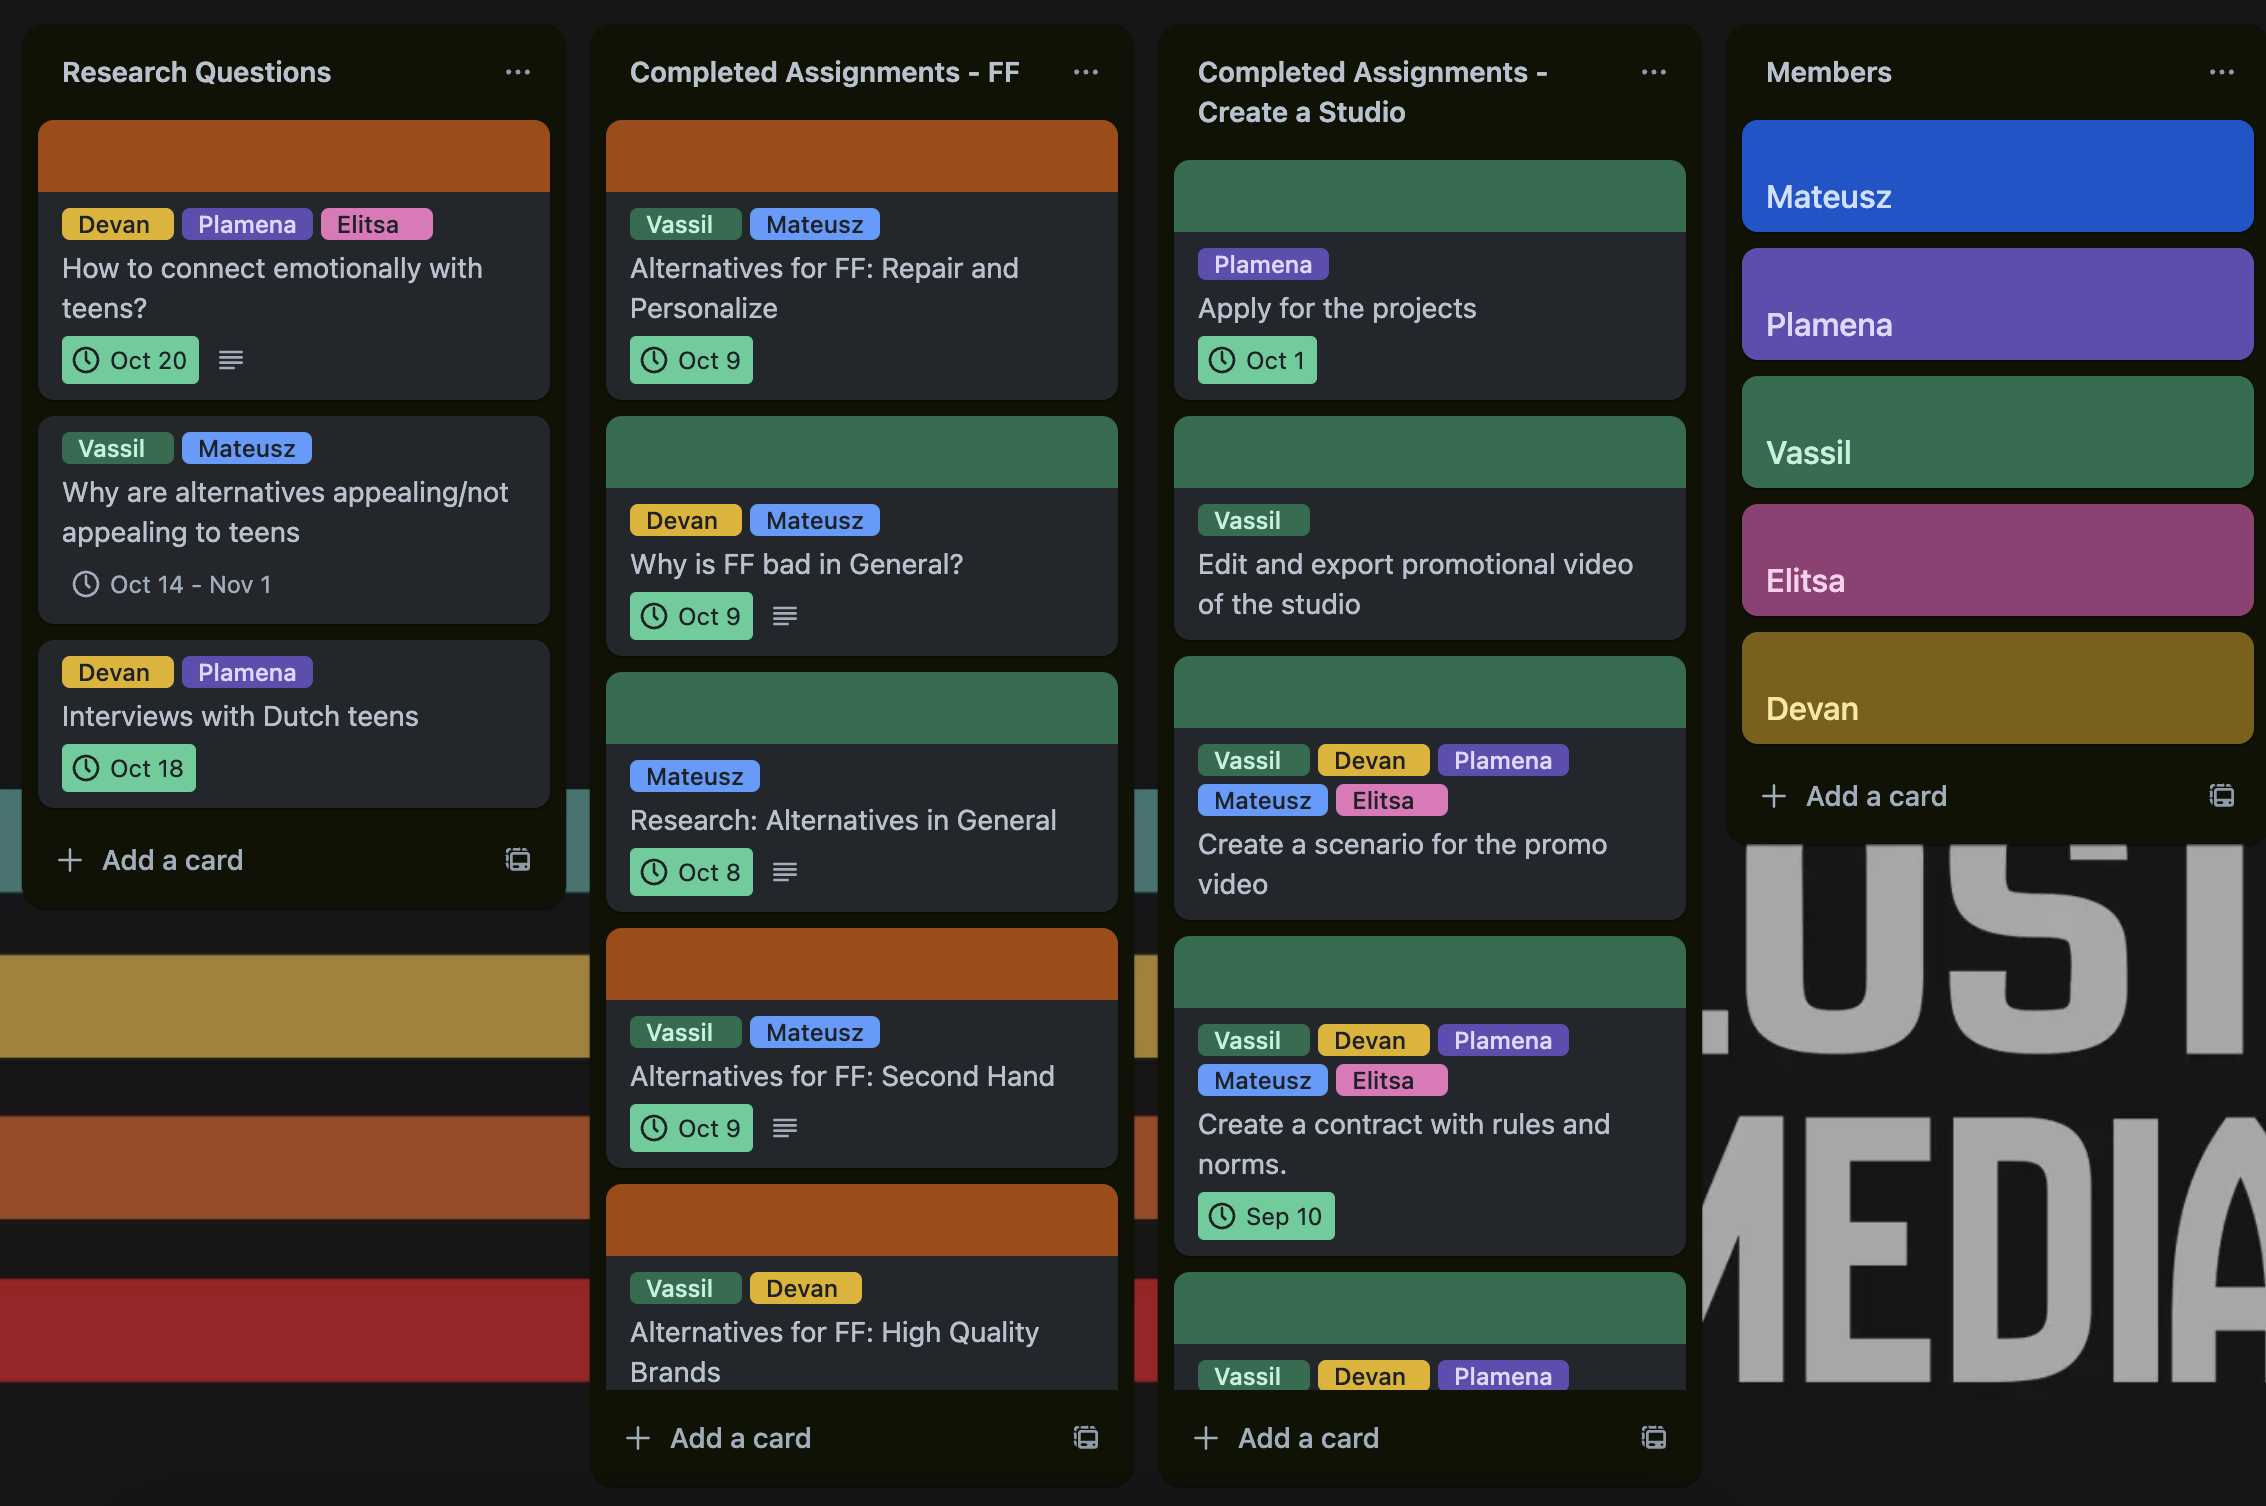
Research DocumentsLO4
Below you can see all the research documents that we have developed as a group. For each research document there will be summary below.
Why is Fast Fashion bad in general? LO4
Alternatives to FF: High Quality Brands LO4
- Look for natural fibers: High-quality garments are often made from natural fibers, like cotton, silk linen, wool, or cashmere. These materials are not only durable, but they also tend to feel more comfortable against the skin and have a better drape.
- Check the stitching: The stitching should be tight, even, and straight. Loose or uneven stitching is a sign of poor quality and can cause the garment to fall apart quickly.
- Look at the seams: Check for double-stitched seams, which add strength and durability to the garment. Also, check for finished seams, which prevent fraying and help the garment retain its shape over time
- Check the lining: High-quality garments often have a lining, which adds structure and durability. The lining should be smooth and wrinkle-free.
- Check the buttons: High-quality garments typically have buttons made from natural materials like mother-of-pearl or horn. These buttons are more durable and look nicer than plastic buttons.
- Look at the details: High-quality garments often display small features that show attention to detail, such as hidden buttons, hand-stitched hems, or reinforced pockets.
- Check the fit: A high-quality garment should fit well and flatter your body. Look for garments that are tailored to your body shape and have a comfortable fit.
- Consider the brand: Look for brands that are known for their quality and attention to detail. These brands might be more expensive, but they're worth the investment if you want a garment that will last you for years.
- Check the care label: The care label will tell you how to care for the garment to ensure longevity. Garments that require delicate care are often of higher quality and will last longer.
- Look for a warranty: Some high-end brands offer warranties on their garments, which can give you peace of mind knowing that you are investing in a quality product backed by the manufacturer.
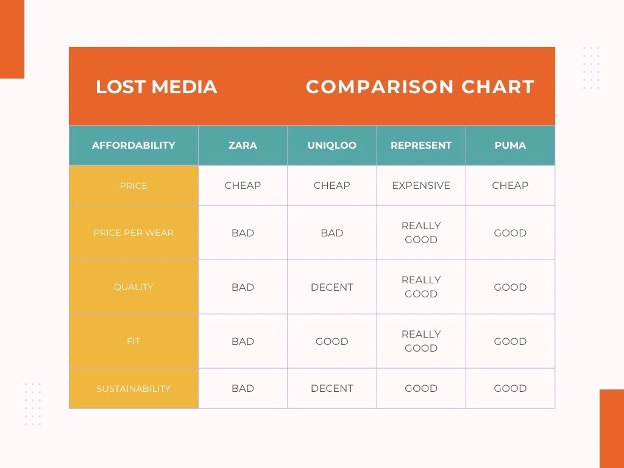 Figure 3 - Devan Janssen
Personal Experience
Personally, I buy a lot of clothes from all kinds of different brands. I encountered a lot of clothes that are of bad quality and high quality. For example, I have a few white garments from Zara. They are the same but still fit differently and are made in different countries, on the other hand I have a few garments from Represent and these garments are of the highest quality that I know of. They are expensive costing 120 euros but lasted me for a few years already.
Presentation - Stakeholder LO4 & LO5
After everyone was done with their research we planned a meeting with our stakeholder to show our progress, find and to present our idea. Elitsa made a presentation with different keynotes we found in our research.
Feedback - Stakeholder LO4 & LO5
The stakeholder was really happy with our presentation. She loved the idea and told us that this idea was really unique. She also liked that we had done a lot of research. As feedback she told us that we have done enough research and that we should make a few concept to show her at a later date. Next up we want to make these concepts and think about our storytelling. After we are done with that we want to plan another presentation with the stakeholder to show our concepts.
Define Phase
Concept Document LO4
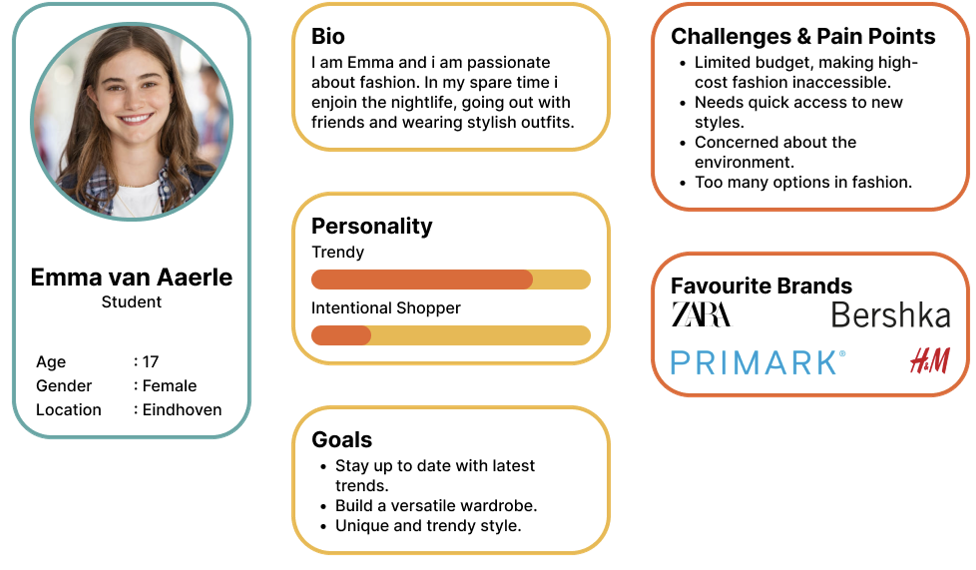
User Persona LO4
Final Design LO1
In the final stage of the define phase we made our design. This design is based on a game with a timeline of events. In the intro screen you get a few messages about the project and what the goal of the game is, after that the game will start. The goal is to have enough money to buy a dress for prom. In the game you have different events that happen every x amount of days. During each event you have to wear clothes which can also break depending on the quality of the clothes.
Develop Phase
Introduction to Development LO2
Before we started developing the game we looked at different ways to develop the game. I looked at different game engines but that was over the top so we wanted to stick to HTML, CSS & JS. But there is a twist. All of us were really eager to learn more about React so we wanted to also build our game in React which for sure was a big challenge. We also made a GitLab repository. Here every member has their own branch that they can safely push to. Before merging changes we used WhatsApp to communicate so that we don't get any merging conflicts.
GitLab - Links
Components LO1 & LO2 & LO3
During development we chose to work with components. Components can easily be used multiple times in our project.
Receipt & Wardrobe LO1 & LO2 & LO3
The first component I made was a receipt. This receipt is show on the bottom left of the page where users can quickly see their wardrobe, because the wardrobe changes often opening the wardrobe every time can get annoying.
Concept 1
For the first concept I had a idea to make a receipt to showcase the wardrobe because we are making a game with clothes ofcourse. Online I found a Font that I can use. Then in HTML & CSS I developed a first concept which you can see in Figure 6.
Small Test
I showed this first concept to the target audience. They really liked the concept and idea of making a receipt. Some told me that it was hard to see what the items looked like and what the durability of these items was. That is why I made a second and third concept.
Concept 2
In Figure 7 you can see the second concept. When the user clicks on the receipt a small window will open with all items. Here you can see the items in a more detailed way. For example see a picture, name, durability & source.
Figure 7 - Devan JanssenConcept 3
in Figure 8 you can see the third concept. When the user clicks on the receipt a wardrobe will open with all items. This is the same as the second concept but with a different style.
Figure 8 - Devan JanssenA/B Testing LO4
Questions
- Is it clear you can open the receipt?
- Is it clear you can click on items?
- Is it clear you can click on the receipt and open the wardrobe?
- Do you find the receipt/wardrobe useful?
I asked five people from the target audience to test the second concept. I asked them if it was clear that the receipt was openable, and that you can click on items to get more information. Most of them opened the receipt by accident, and did not know you could click on the items in the receipt. I would had to make them aware. After I told them how they could see more information, some of them found it usefull whiles two people found it weird and out of place.
I also asked five other people to test the third concept. Here we had the same outcome as the first concept. The users did not know that you can click on the receipt. But when i explained that you can all of them loved the idea of a wardrobe. Just needed a better style.
Conclusion
To conclude my testing i have chosen to stick with the third concept and make it look more appealing.
Final Iteration LO1 & LO3
Using the feedback from the A/B Tests I improved the third concept. I made the wardrobe it self look more appealing and added a header on top of the wardrobe. All the items are shown in a grid. When hovered over an item more information about the item will be shown. You can also wear these clothes here and advance to the next event. You can see this in Figure 9.
Figure 9 - Devan & PlamenaTimeline LO1 & LO2 & LO3
Iteration 1 LO3
I first designed the timeline in Figure 10. It is based on a timeline where the game cycles trough main events and secondary events. We all liked this idea because after events have ended screens will be shown with outcomes and days passed. However the design did not fit with our overall game design.
 Figure 10 - Devan Janssen
Iteration 2 LO3
Because Figure 10 was not good enough I tried to do a different approach. Here I found out it might be smart to add dynamic events that turn green when an event is completed. I quickly asked the target audience and they all liked this. Meaning this is the timeline we will use. You can see this iteration in Figure 11
 Figure 11 - Devan Janssen
Final Iteration LO1 & LO3
I made a timeline (Figure 12) where the user can easily see how many events are completed and how many events are left. I did this by using a react.map function which checks for how many events are in the json file. For each event it generates a circle that you can see below. In between each event a line will be generated to show progress between the events. If the event index is active it will also change the color to green and show a check to better visualize.

Events LO1 & LO2
We also have different events. Each event has a different image which will be shown as a card. When hovering over the card more information about the event will be shown. All events have a 'wear from closet' and 'buy from store' button. When pressed on the button the gamePhase will be updated which I will explain later.
 Figure 13.1 - Matheusz
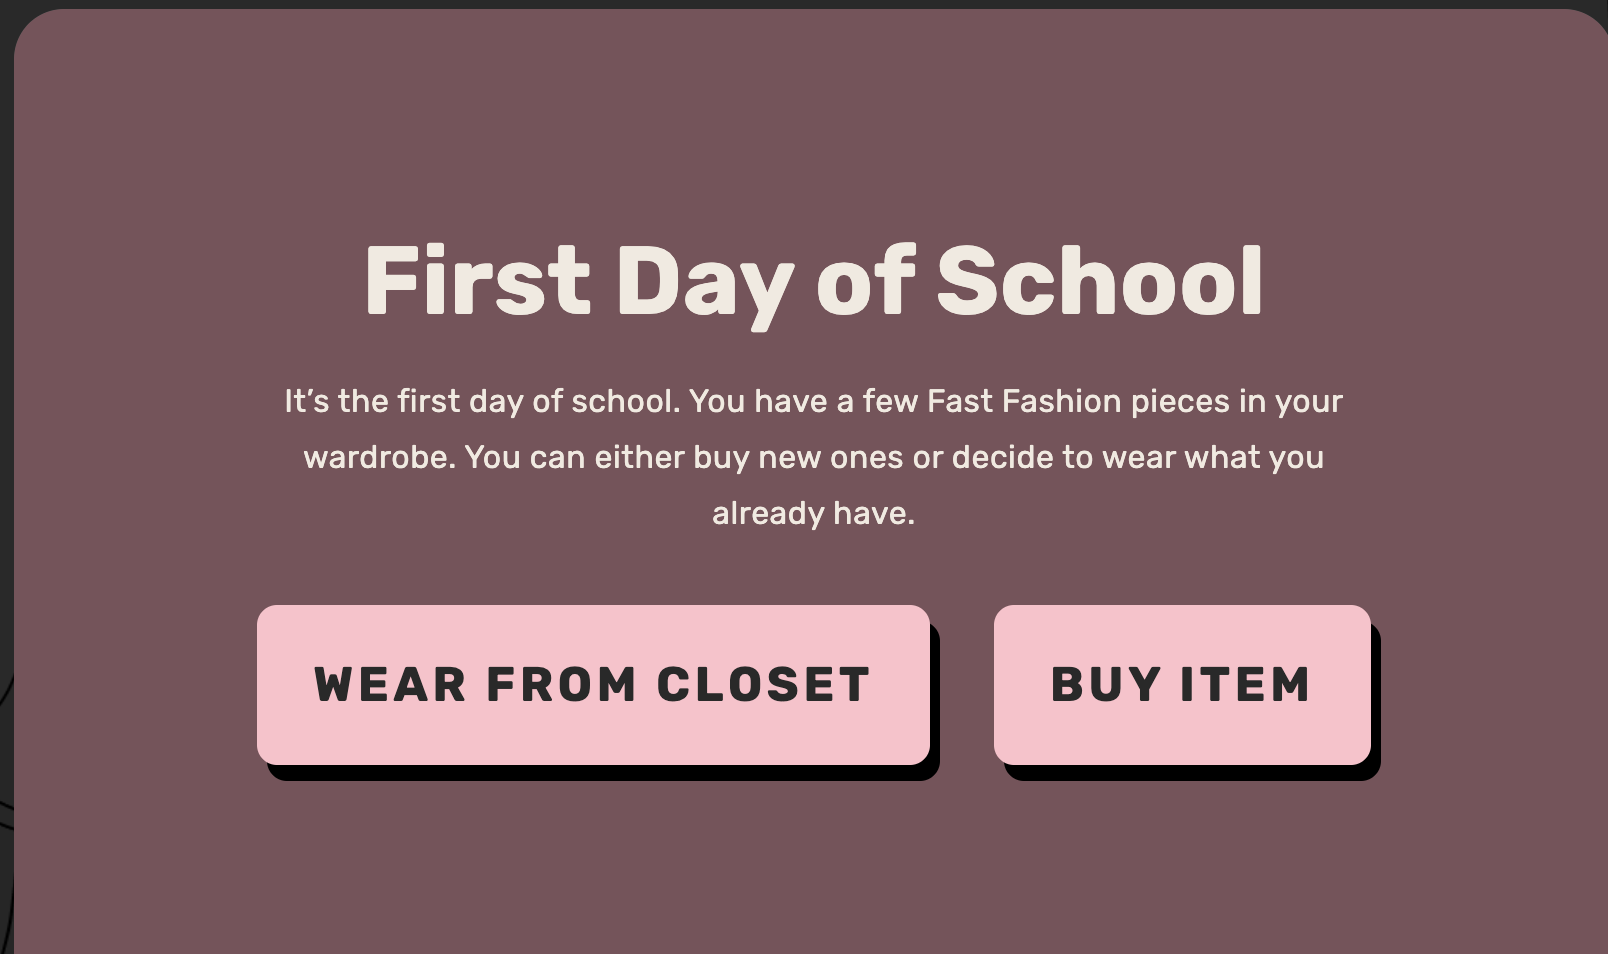 Figure 13.2 - Devan & Matheusz
Store LO1 & LO2
The store has three items that can be bought. We first had a dynamic store where the items are based on the index in the JSON file, but after some feedback we decided to make a static store with three items based on the eventIndex. This means that for specific events we can show specific items.
When hovering over a item more information is shown about the item. You can see how this works in Figure 14.
Persuasive Design LO1
We also added a persuasive design to our game. This means that we added a few elements to the game to make the user want to play the game. Lets start with the first element.
Framing
Users often tend to compare various products before making a purchase decision or signing up for a service. This is because they want to make a decision that brings them the most value. The persuasive principle of framing, also thought of as the Goldilocks principle, appealingly compares different options. For example, you might have seen various websites display two payment options side by side to help customers choose the best fit for their situation. We did this in the store so that the user can compare the items and choose the best fit for their situation.
Scarcity
Scarcity is a persuasive principle that encourages users to take action quickly. It works by creating a sense of urgency and making the user feel that they need to act now to avoid missing out. We used this by adding "Sources" to items in the store. Meaning some items are only shown once and there is a possibility that some items break quickly.
Interactive Design LO1
Because we made a game we have a lot of interactive elements to make the user want to play the game. Below you will find a few examples
Words (Dimension 1) & Visual Representations (Dimension 2)
We mostly used these two dimension. Because we made a game almost every element & functions is a visual & text based representation for example the timeline, the store, the wardrobe, the receipt, etc. All of these elements are used to make the user want to play the game.
Game Logic LO2
Here I will explain the game's logic.
Game Phases LO2
gamePhase 1:
When the gamePhase is 1 the event will be shown based on the eventIndex. As explain earlier all events have buttons that needed functions. You can see these functions in Figure 15. When the user open the wardrobe the wardrobe is shown and the event is hidden. When the user wants to buy something from the store the gamePhase will be set to 2.
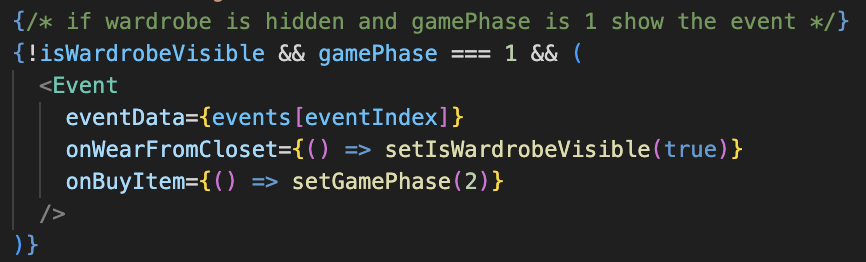 Figure 15 - Devan Janssen
gamePhase 2:
When the gamePhase is 2 the store will be shown. Each store has different items based on the eventIndex. When a item is purchased from the store it will be added to the wardrobe, the outcome will be set and the gamePhase will be set to 3. You can see this working in Figure 16.
 Figure 16 - Devan Janssen
gamePhase 3:
When the gamePhase is 3 the outcome will be shown based on the item purchased. When the user clicks on the continue button the gamePhase will be set to 4. This can be seen in Figure 17.
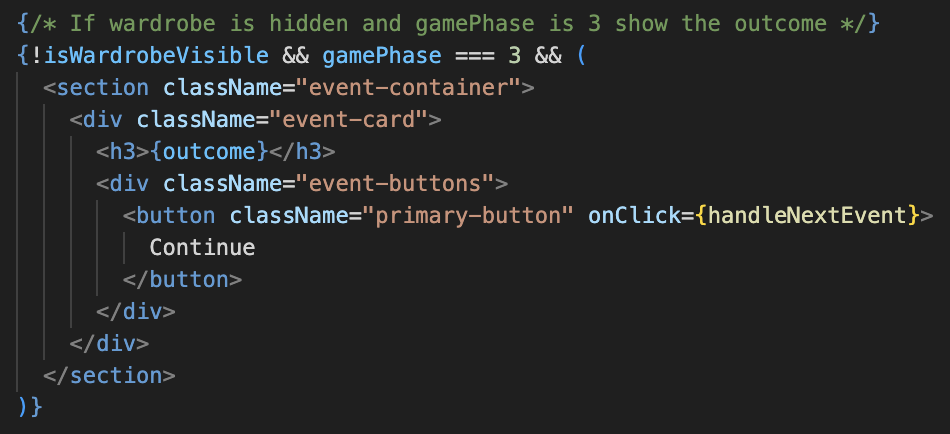 Figure 17 - Devan Janssen
gamePhase 4:
When the gamePhase is set to 4 a message will be shown with 'x' amount of days has been passed. This demonstrated that between each days a different amount of days have been passed to better simulate a schoolyear. Also after 'x' amount of days has passed the user will get 'x' amount of euros from their Caretakers. When the user clicks on the continue button the gamePhase will be set to 1 again and the cycles starts over with the next eventIndex (event 2). As shown in Figure 18.
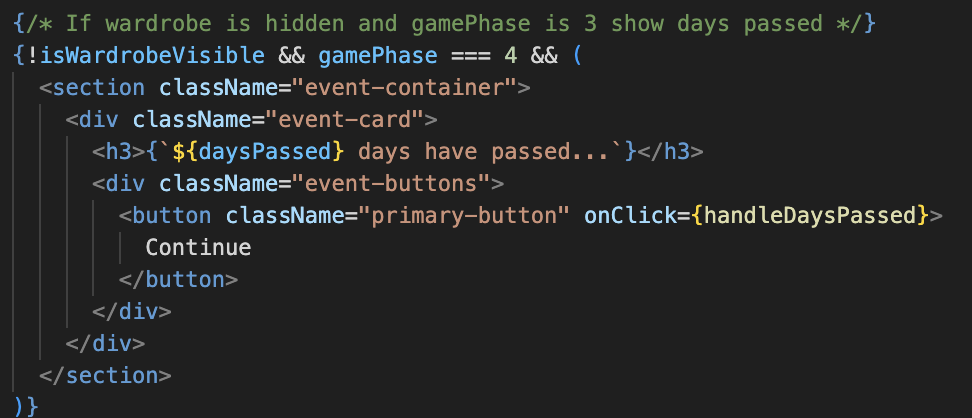 Figure 18 - Devan Janssen
Final Game LO1
During our finale stages of this project we put all of our components and functions together to make the final game. This game can be seen below. You can even play the game yourself.
You can find the game below there might be a chance that I have already developed the next project and that the website is replaced with my passion project. Sorry if this happened.
Deliver Phase
Upload to Hera LO2
To upload our game to Hera I used the 'npm run build' command in the terminal. This command makes a 'dist' folder. The 'dist' folder is a simplified version of our game meaning everything still works but we only have a single html, js and css file. I then uploaded the 'dist' folder to Hera and the game was ready to be tested.
Final Presentation
When our project was finally done we held a presentation for our stakeholder, teachers & students. In this presentation we talked about our journey during this project. We also showed what our game is about, the game phases and how our game is played in general.
Watch the presentation here (long video)Feedback Stakeholder
Our stakeholder loved our game and was really pleased with the design, As feedback we heard that we have to polish a few things for example the budget & item prices. Also some outcomes did not fit the bought item.
Future Plans
Our client (Night of The Nerds) hosts a special event each year. During this event we can show our project, which is perfect for us and also perfect for the client. We have a lot of future plans that I can talk about.
As stated before we got a lot of feedback during our presentation. Below you can find our Advice Report. In here you will find our future plans & struggles.